
PET CARVING IDEAS
Cat pumpkin carving ideas that look like your cat
For a quick cat pumpkin, carve a classic black-cat silhouette: an arched back, a tall tail, and two glowing eyes. For one that looks like your cat, carve a portrait from a close-up photo and plan the ears, eyes, whiskers, and markings for how they'll look lit from inside.
Classic cat pumpkin ideas
These are silhouettes: one bold shape cut through the wall, easy enough for a first carving.
- The arched-back Halloween cat. Fur on end, tail straight up. Put it in front of a cut-out full moon and the cat becomes the dark shape against the glow.
- Cat on a fence or rooftop. The fence line gives the cat something solid to sit on, which keeps the design strong.
- Cat face with glowing eyes. Two almond eyes, a triangle nose, and pointed ears on an otherwise uncut pumpkin. It reads from across the street.
- Cat in a witch hat, or peeking over the edge of a cauldron.
- Sitting cat and stars. A tall sitting outline with a few small stars or dots drilled around it.
- Cat and mouse. A cat on the front and a small mouse "escaping" around the side.
For any silhouette, keep the tail and ears at least as thick as a pencil at your printed size, and connect the tail to the body or the frame. Thin, unsupported points snap off.
Carve a portrait of your own cat
A portrait shows the things that make your cat yours: the shape of the ears, the markings on the forehead, how wide-set the eyes are. It needs a pattern made from a good photo.
- Face the camera. A straight-on face with both eyes open reads better than a profile or a curled-up nap.
- Fill the frame. The head should fill most of a square crop, ears included.
- Use soft, even light. A window in daytime works well. Flash can turn eyes into glowing discs and flatten the fur.
- Catch them relaxed. Ears pinned back or a yawning mouth changes the face more than you'd expect.
You can make a pattern yourself: turn the photo grayscale, boost the contrast, reduce it to two or three tones (in GIMP, Colors, then Posterize), and then add bridges so no kept piece floats loose. Or let CarveKin make one: an AI image model draws a design from your photo the way it will look lit, and then the pattern is repaired and checked at your print size so every kept piece connects and no cut is too narrow. One pattern is $4.99, and you see a first look before you pay. Our guide to making a pattern from your pet's photo covers cropping.
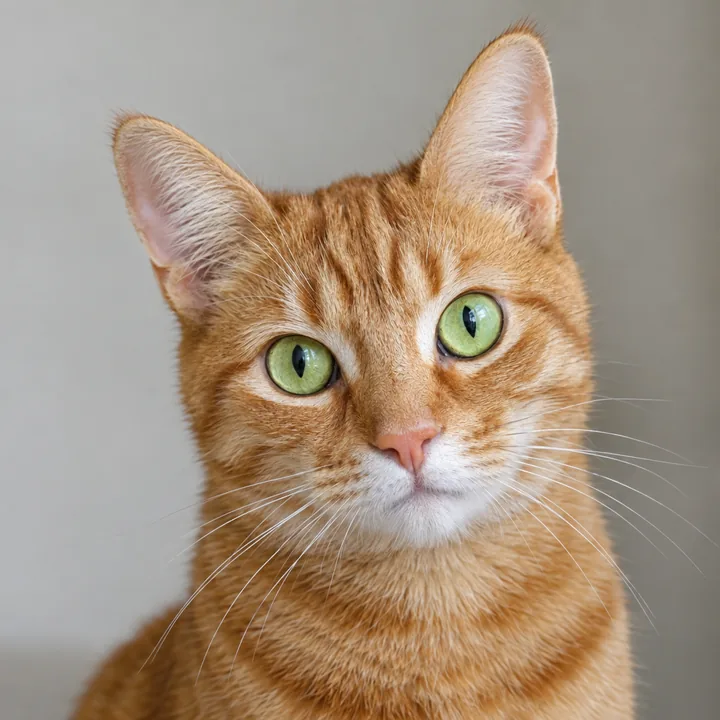
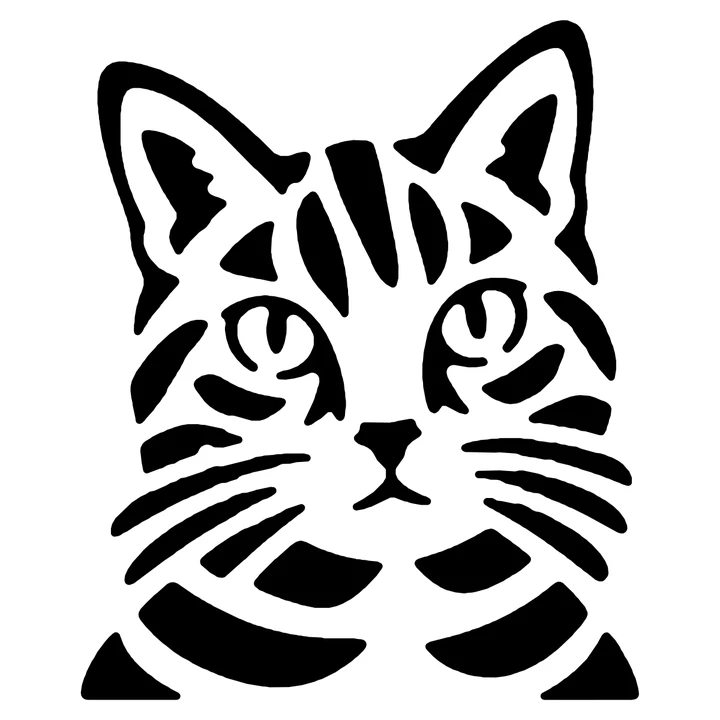
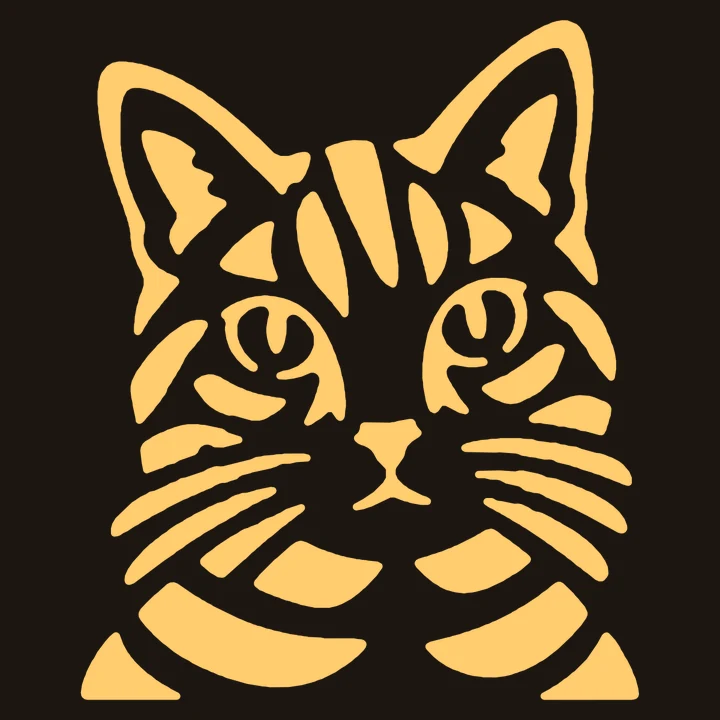
This tabby was requested at Standard detail, but its stripes needed Challenging detail to hold together. More in the examples.
Ears, eyes and whiskers
What glows is what you cut. At night the holes are bright and the uncut wall is dark. Cut the light parts of your cat, keep the dark parts, and the portrait will look right when lit.
- Ears. Cat ears are triangles that stand outside the head outline, so they are the easiest feature to recognize. If the inside of the ear is pale, cut it and keep a solid rim around the edge. That rim holds the ear tip on. If your cat has ear tufts, add them as two or three short points on the tip.
- Eyes. The eye is usually the brightest thing in a cat photo, so cut the almond shape and keep the pupil. Pupils change shape with the light, so copy the shape your photo shows. A pupil inside a cut eye has nothing to hold it, so connect it to the top or bottom lid with a thin bridge, or etch the eye instead of cutting through.
- Nose and mouth. The small upside-down triangle nose and the line down to the mouth are what make a face read as a cat, even at a distance. Keep them bold and simple.
- Whiskers. Real whiskers are far too thin to cut. You have three options: leave them out, draw them as a few thicker exaggerated lines, or etch them as scraped lines that glow faintly. A row of small drilled holes along each whisker line also reads well when lit.
Tabby stripes and the forehead M
According to the Cat Fanciers' Association, every tabby-patterned cat has the characteristic M marking on its forehead, plus "mascara" lines around the eyes and markings on the cheeks. Those face markings are what make a tabby portrait look like a tabby, so keep them even if you drop the body stripes.
In a cut-through pattern, the dark stripes stay as uncut pumpkin and the lighter fur between them is cut. That works in your favor: stripes act as natural bridges that hold the face together. The catch is that fine stripes become very narrow strips of pumpkin, which is why stripy cats often need a more detailed pattern and a sharper saw.
For softer stripes, use three tones instead of two:
- Cut through the palest fur for full glow.
- Etch the mid-tone fur by scraping off the skin and a little flesh, so it glows softly.
- Leave the dark stripes, the M, and the eye lines untouched.
Test with a light inside as you go, and scrape more where an area looks too dark. The face-carving guide explains etching depth in more detail.
Black, white and patched cats
- Black cats. Good news: a portrait of a black cat lit correctly looks a lot like the classic Halloween cat. Most of the face stays uncut, the eyes glow, and you cut the background around the head so the ears and outline shine. Add the eye glints and any white whiskers or chest patch.
- White and cream cats. Most of the face gets cut, so the pattern depends on the shadow lines around the eyes, nose, and ears to hold together. Choose a photo with gentle side light so those shadows exist, and consider etching large pale areas instead of cutting them.
- Tuxedo, calico and tortoiseshell cats. Patches read well because they are big shapes. Simplify each patch to a clean edge rather than trying to follow every hair.
Keep your cat safe around jack-o'-lanterns
Cats climb, sniff, and bat at things, so where you put a lit pumpkin matters more than it does with most pets.
- Skip the candle. The ASPCA warns that pets can easily knock over a lit jack-o'-lantern and start a fire, and that curious kittens are especially at risk of being burned or singed by a candle flame. A flameless LED light removes the risk, and NFPA fire safety guidance calls a flashlight or battery candle the safest choice.
- Mind the cords and batteries. The ASPCA also says to keep wires out of reach. If you use string lights, route them where your cat can't chew them. Pet Poison Helpline warns that chewed or swallowed batteries can cause burns, so keep loose tea lights and button cells put away.
- Pumpkin is not the poison. The ASPCA lists pumpkins as non-toxic to cats, though nibbling can upset a stomach. Molds that grow on old decorations are the bigger concern. Throw a pumpkin away once it turns soft, discolored, or smelly, as Texas A&M's veterinary school advises.
- Carve somewhere the cat isn't. Loose strands, seeds, and a sharp saw on the table invite a curious cat. Close the door while you work, and clean up afterward.
If you think your cat has eaten something harmful, call your veterinarian, Pet Poison Helpline at (855) 764-7661, or the ASPCA Animal Poison Control Center at (888) 426-4435 (a fee applies).
When your pattern is ready, the step-by-step carving guide covers transfer, cutting order, and lighting, and the printing guide makes sure it prints at the right size. Carving a dog too? See dog pumpkin carving ideas.
Make a pattern from your cat's photo
Sources
- ASPCA, Halloween safety tips
- ASPCA, Top 5 tips for a safe Howl-o-ween
- ASPCA, 5 toxic seasonal plants you don't want your pet to fall for
- Texas A&M Today, Pumpkin safety for a pet-friendly Halloween
- Pet Poison Helpline, Batteries
- Connecticut Commission on Fire Prevention and Control, NFPA Halloween fire safety tips
- The Cat Fanciers' Association, Patterns in the domesticated cat: tabby patterns
- Preventive Vet, How to carve a photo of your dog or cat onto a pumpkin
- Kids of the Wild, How to carve a perfect pumpkin (shading levels)