
PHOTO GUIDE
How to choose a photo for a pumpkin carving pattern
Pick a sharp photo of one face, taken from the front or a slight angle, in soft light that comes from one side, against a plain background that is lighter or darker than the subject. Then crop it so the face fills most of the square. Most disappointing photo pumpkins start with a photo that breaks one of those rules, not with the carving.
Quick checklist
- One subject: one person or one pet, with nobody else overlapping.
- Close up: the head fills most of a square crop.
- Front or three-quarter view: both eyes visible, camera at eye level.
- Soft light from one side or the front: a window or open shade, not noon sun or a head-on flash.
- Separation: the subject is clearly lighter or darker than what is behind it.
- Clear eyes: no sunglasses, hat brims, hair, or deep shadows across them.
- Sharp and original: in focus, and the original file rather than a screenshot or a copy saved from a chat.
Why the photo matters so much
A cut-through pattern like ours has only two tones. Every part of the design is either cut away, so light shines through, or left as pumpkin, which stays dark. There is no gray, no color, and no fine texture. What survives is the pattern of light and shadow on the face: the dark of the eyes, the shadow beside the nose, the line of the mouth, the outline of the hair.
A pattern also has to be cut by hand at a real size. Details narrower than a saw can manage disappear, and pieces that would float free need a bridge of pumpkin to hold them. So a good pattern photo is one where the features that make someone recognizable are big, clear shapes of light and dark. Pretty photos are not always good pattern photos. A soft, dreamy portrait with even light everywhere can turn into a blank oval.
One subject
Choose a photo where one face is the whole point. Another person's shoulder, a hand on the cheek, a toy in a dog's mouth, or a second pet in the corner all turn into shapes that compete with the face. If you love a photo that has someone else in it, crop to your favorite face and make a second pattern for the other.
Face size in the frame
The head should fill most of the square crop. This matters more than people expect, because the pattern is printed at a fixed size. On a Medium pattern of 180 mm (about 7 in), a face that fills only a third of the frame is roughly 60 mm (2.4 in) wide. The eyes on that face come out around 12 mm (half an inch) across, which is too small to keep the eyelids, pupils, and brows that make them look like anyone in particular. Fill the frame and the same eyes are three times bigger.
Full-body photos, a child on a swing, or a dog across the lawn nearly always fail for this reason. Choose a head-and-shoulders photo, or crop hard into a sharp one.
Front or three-quarter angle
- Straight on is the safest. Both eyes, the nose, and the mouth are all visible and balanced.
- A three-quarter view, with the head turned slightly, often looks more like the person because the nose and cheek get a shadow side. Keep both eyes visible.
- A profile shows one eye and loses most of the face. It can work as a silhouette, but it rarely reads as a portrait.
- Camera at eye level. Photos taken from above make the forehead big and the chin small; photos from below show nostrils and chin.
- Don't hold the phone too close. Very close shots make the nose look too large compared with the rest of the face. This comes from the camera distance, not the lens. Step back a little and zoom in, or use your phone's 2x or portrait setting.
Even, directional light
The best light is soft but still comes from one direction, so the face has gentle shadows that show its shape. Those shadows become the lines in your pattern.
- Window light. Stand the person beside the window, turned slightly toward it, so the light falls across the face from one side. Choose a window with no direct sun coming through.
- Open shade outdoors. On a sunny day, move into the shade of a building or tree, near its edge, where bright light still reaches the face.
- Avoid overhead sun. Midday sun makes dark pools in the eye sockets and under the nose. In a pattern, the eyes can become two black holes with no detail.
- Avoid a head-on flash. It flattens the face, so the nose and cheeks have no shadows to become shapes.
- Avoid backlight. A bright sky or window behind someone turns them into a dark shape with no features.
- Avoid very dark photos. Evening and indoor party shots are often dark and grainy. Grain turns into speckles or nothing.
Contrast between subject and background
The outline of the head is one of the strongest things in a pattern. Dark hair against a dark sofa, a black dog on a black rug, or a blonde child against a pale wall all merge into the background, and the head loses its shape. Look for a photo where the subject is clearly lighter or darker than what is behind it. A plain background is best; a busy one (leaves, a bookshelf, a crowd) adds shapes that have nothing to do with your subject.
Inside the face, you want some contrast too: visible eyebrows, a defined mouth, shadows under the cheekbones. A photo that looks flat on screen usually makes a flat pattern.
Keep the eyes clear
People recognize a face mostly from the eyes and brows, so protect them.
- Sunglasses replace the eyes with two dark lenses. Choose another photo.
- Hat brims and hoods throw a shadow across the eyes. Tilt the chin up slightly or pick a photo without the hat.
- Bangs and loose hair over the eyes turn into stripes that cross them.
- Glasses can work, but reflections and frames add thin lines. On our examples page, we note that faces with glasses often only hold together at a finer detail level. If you have a photo without glasses that still looks like them, try that first.
- Face paint, masks, and costumes can be fun, but they hide the face you want people to recognize.
Sharpness and resolution
A recent phone photo has more than enough pixels. The usual problem is a small, soft face inside a big frame. After you crop to the head, zoom in on your screen: if the eyes look blurry, smeared, or blocky there, they will look worse as a pattern.
- Use the original photo from your camera roll. Copies saved from social media or messaging apps are often shrunk and compressed.
- Avoid screenshots of photos, and photos of printed photos taken at an angle or with glare.
- Pick the frame where the eyes are in focus. Motion blur from a moving child or a wagging dog blurs the details that matter most.
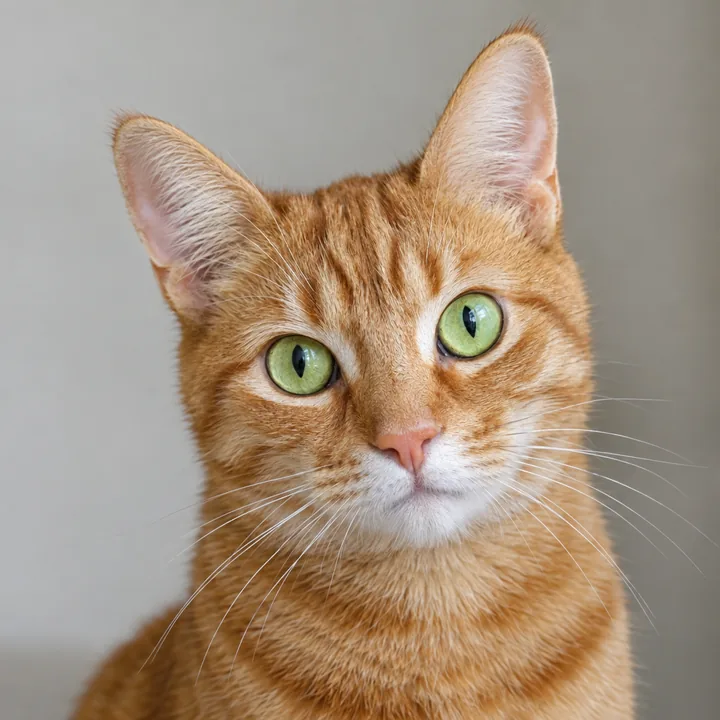
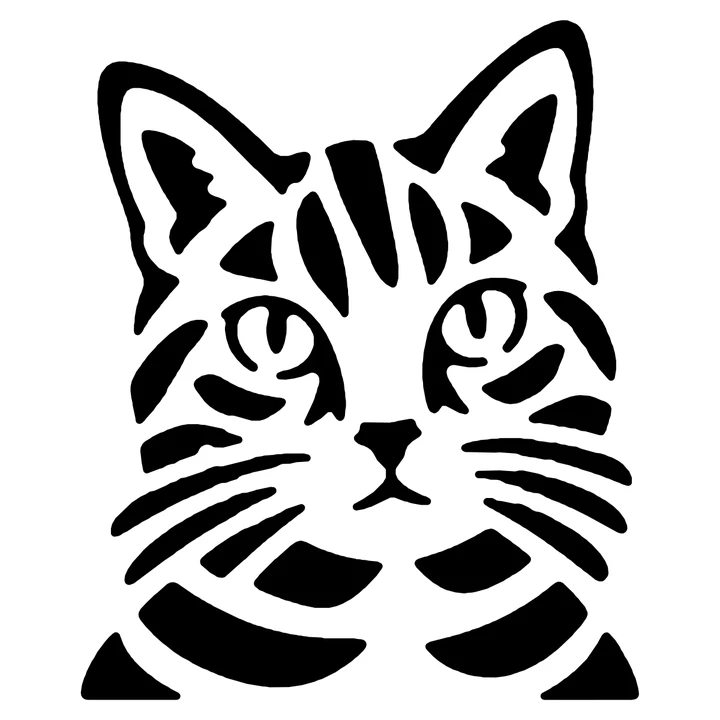
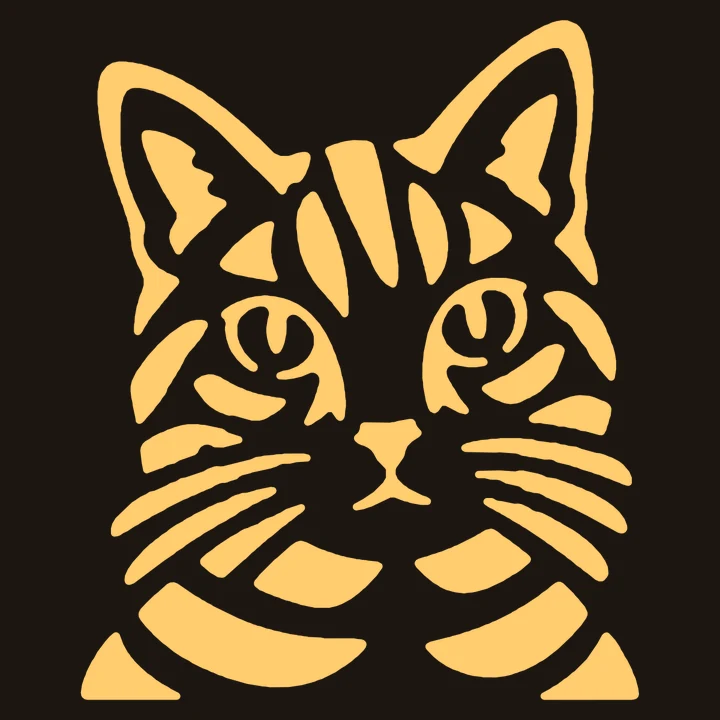
Sample photo made with AI, not a real customer. The glowing view is a digital preview, not a photo of a carved pumpkin.
Pets
Pet photos follow the same rules, with a few extras. Our pet pattern guide covers cropping and difficulty levels; here is how to take or choose the photo.
- Get down to eye level. Kneel or lie on the floor. A photo looking down at a dog makes a big head and a tiny body, and hides the eyes under the brow.
- Ears up and visible. Ears are often what makes a pet recognizable. A squeak or a treat held just above the phone for a second can bring the ears up and the eyes to the camera.
- Face toward the light. Turning a pet toward a window puts a small highlight in each eye, so the eyes read as eyes instead of dark holes.
- Dark or light coats. A black dog loses its outline against a dark background, and a white cat disappears against a pale wall. Choose shade or window light over harsh sun, and a background of the opposite tone.
- Awake, not curled up. Sleeping pets hide their eyes and turn into a round shape.
For ideas on what to carve, see dog pumpkin ideas and cat pumpkin ideas.
Group photos: why one face per pumpkin
A pumpkin has one good carving face, roughly the size of a sheet of paper or smaller. Put two faces side by side and each gets half the width; put four and each gets a quarter. At that size, eyes and mouths shrink below what can be cut, and every face turns into the same blob. That is why group photos, family portraits, and crowded selfies usually lose too much detail to carve.
A row of pumpkins with one face each looks better on a porch anyway. Crop each person out of the group photo if they are big and sharp enough, or use a separate photo for each. Our Family pack is five patterns for $9.99, so everyone can have their own; it needs a free account.
How to crop
- Crop to a square around the head. Include the whole head and the outline of the hair or ears. The shape of the head helps people recognize someone.
- Put the eyes a little above the middle. This leaves room for the mouth and chin.
- Leave a small gap around the head rather than cutting off the ears, hair, or chin.
- Cut out distractions. Crop away hands, shoulders of other people, and bright objects at the edges.
- Don't crop so tight that the face is cut off. A face with the forehead or chin sliced off looks odd once it glows.
When you upload a photo to CarveKin, you drag the square to crop it. Our photo check warns you if it can't find a clear subject, sees more than one subject, finds the subject small in the square, or thinks the photo looks dark, flat, or blurry. You see a first look before you pay. If we can't make a carvable pattern from your photo, your credit is not used, and you can try a tighter crop or another photo.
Quick test: shrink the cropped photo to the size of a postage stamp on your screen and squint. If you can still tell who it is, it will probably make a good pattern.
Once you have your pattern, print it at actual size, then follow the photo carving guide. Choosing the pumpkin matters too: see how to pick a pumpkin for carving.
Sources
- Perspective distortion, Wikipedia (close camera distance enlarges the nose in portraits).
- The Ultimate Guide to Natural Light Portraits, SLR Lounge (overhead sun and open shade).
- Tips for Taking Great Photos of Your Dog, American Kennel Club (eye level, soft light, toys and treats).
- How to Photograph Your Black Dog, Karen Hoglund Photography (shade, catchlights, contrasting backgrounds).
- How to Carve a Photo of Your Dog or Cat Onto a Pumpkin, Preventive Vet (high contrast photos; small features and whiskers are hard to carve).
- How to Create a Pumpkin Carving Stencil in Photoshop, How-To Geek (two-tone conversion; floating and thin pieces).